![]() Tutorial Levels
Tutorial Levels
Created by Mike Vermeulen
Note: As DeePsea is expanded, specific details may change, but it should be easy to figure out what to look for.
Tutorial for use with files DOOM1TUT.WAD, DOOM2TUT.WAD and HEXENTUT.WAD (v2.16)
This document is designed to be read from top to bottom, no help skipping around, so relax!! It is divided into four parts: Please see A detailed look at WAD files for technical information.
Part I Seeing is believing!
This covers a walk through of the tutorial wad. Please take a tour through the level. It makes the second part of the tutorial clearer.
Part II Show and tell
The second half is designed to show you how to make simple objects, like a teleporter and lift. It uses the tutorial wad for reference.
Part III Some more examples
The third part is an overview of the level DEEPEXAM.WAD. It is an example of a level drawn using the predefined tools in DeePsea.
Part IV HEXEN information
The fourth part is an introduction to the level SCRIPTS.WAD. It is an example of simple scripting using the ACCS compiler.
We Need your Input!
I don't always remember what I wanted to learn about as a beginner. If there are parts that seem illogical or there are sections you would like to see, by all means let me know, it will be appreciated.
See the screen under Help or the first Help screen for my email address. Please put DeeP tutorial as the subject of your message.
Thanks and enjoy!
Mike Vermeulen
Which WAD to use
Use the following PWADs depending on the game:
1. DOOM I : use DOOM1TUT.WAD.
2. DOOM II : use DOOM2TUT.WAD.
3. HERETIC : use HERTUT.WAD. (not included with this tutorial, see below)
4. HEXEN : use HEXENTUT.WAD. (!! This is a rough draft !!)
The DOOM I and DOOM II tutorials are covered here (HEXEN is similar, but all the descriptions have not been changed). Some changes were made in HEXENTUT.WAD since HEXEN crashes on some types!
You can make a HERETIC version using DeePsea to convert the DOOM2 version.
Note
The HEXEN version is similar to DOOM, but in some areas HEXEN has some mistakes? or the LineDefs behave differently then I thought? Anyway, the upper left hand corner of the level, with the 3 floors do NOT operate consistently. On top of that, they go the WRONG direction part of the time *and* HEXEN may crash your system if the floor goes into infinite lower. Go figure
The names of the Door keys are different, but the directions are OK. The HEXEN version also has some simple scripts added for sounds and a swinging door. The script is in HEXENTUT.ACS. The nodes were built using a node depth value of 16 using Type 3 nodes.
Hey, this is a tiny level!
Note: Print out this documentation before going through this level. That way, you don't have to recall why certain structures are important from memory.
Print out this map for reference before you begin editing with DeePsea.
DOOM VERSION NOTE
This WAD file has only been tested on DOOM 1.9 and DOOM II 1.9. Using any version lower than 1.9 may not give the correct results when using a switch.
Not all triggers (both switch and walking) are in DOOM 1.4 and lower. If you have a DOOM version lower than 1.666, this WAD will not work. This wad will work on any version of DOOM 2, although I recommend downloading the 1.9 patch anyway to avoid problems.
PART ONE: WALKTHROUGH
To see the tutorial levels in the game, type one of the following:
DOOM -FILE {DeePsea directory}\DOOM1TUT.WAD <---- DOOM I
DOOM2 -FILE {DeePsea directory}\DOOM2TUT.WAD <---- DOOM II
HEXEN -FILE {DeePsea directory}\HEXENTUT.WAD <---- HEXEN
{DeePsea directory} refers to your DeePsea directory name and this PWAD location. For example, if DeePsea is stored in C:\DEEPSEA, you would look in:
DOOM -FILE C:\DEEPSEA\DOOM1TUT.WAD
Start a normal game of DOOM and you will be in the tutorial.
The First Room
The Four Switches
The first room of this WAD contains four switches, which are in front of you. In order to observe what the switch does, position yourself to face the southwest corner. This way you'll see what is going on.
Switch One
Use the far left switch (switch 1), it lowers the floor to the neighboring floor (you are presently standing on the neighboring floor).
Switch Two
The switch second from the left affects the pillar in the northwest corner, so try to look at it when you use the switch.
Using this switch lowers the pillar in the northwest corner until it is 8 units above the neighboring floor (again, the floor you are standing on).
Switch Three
The switch second from the right will raise the ceiling to eight units below the neighboring ceiling.
Switch Four
Finally, the switch on the far right will raise the ceiling of the two southern blocks to eight units below the neighboring ceiling.
Two New Teleports!
By using the two middle switches you will reveal two teleports, one in the northwest corner and one in the northeast corner. Walk onto either one of these teleport pads. You are transported to the other teleport! Oh, it's possible to leave one pillar down and teleport inside of it. Of course you are stuck and the world looks strange!. Use the following clip code to get out:
casper HEXEN
idspispopd DOOM
idclip DOOM II
Just type the word shown for the applicable game. Watch the top of the screen! To reverse the action, type the same word again. This is the normal way to play and test levels. This cheat code does not work in death match (for obvious reasons<g>).
When you have finished observing the results of using these switches, it's time to move onto the next room.
The four doors in this room will all take you to the same place. Go through all four to see how doors work. Note that the door on the far left requires that you press the switch.
A special kind of Door
The second door from the right is quite interesting. It has a metal grate! Look at the way it is made, very unusual construction, but that's what it takes to make a door like this work. If you try to put that texture on a regular door, you'll find that the texture won't display correctly.
Don't worry right now about how to do this, but remember that when you run the Error check, this door produces DeePsea texture check errors. Please ignore this error, since if you fix it, the door won't work!
The Second Room
The second room of this level contains two switches, and one lift that is triggered by walking over a Linedef. For now, let's focus our attention on the switch closest to the doors.
There is a twitching body by the switch. Walk up to the switch and use it. Directly in front of you a staircase begins to rise! Watch the stairs appear and when the staircase is done rising, go up it and obtain the blue keycard (Axe for HEXEN). You will need this key to enter the rest of the level.
After you get the keycard, walk over to the lava pit and stand in it for a moment or two! Ouch! Collect a medikit if you need one (in the HEXEN level this is after the Axe door -north-).
Now walk over to the southeastern door of this room, marked by blue skulls on the wall. Try opening the door. Nothing happens. This door requires that you press the switch located directly behind it, so walk north a little and turn back.
See the switch sticking out of the ground? Use this switch and watch the door open. Walk into this room and press the button. The switch lowers, revealing another switch and the yellow key card. Collect the yellow keycard and press the switch. Lights on!
Finally, before moving on, walk up to the rectangular shaped block. As you walk up to it from the east, it lowers, allowing you to hop on. If you look on your automap (press TAB) you will see that there is a yellow line in this room. Whenever you walk across this line, the lift will lower! Let's move on to the yellow keycard door.
The Yellow Key Card Room
Walk up to the yellow keycard door and open it up. Once inside, you will see a lift near the southeast corner. Where should you go from here? The arrow provides a subtle<g> hint? No, it just points to the secret room. Before opening the secret door, look on your map. Note that the secret door only shows up as a red line. Now, open that door.
Once inside this secret room, look to your right. The torch appears to be giving the room some light. In fact, this isn't true. This is a special effect. The light you see is created by making four Sectors, each with different light levels. Now let's look at those boxes.
In front of you is one switch. Press this switch and a lift lowers. Pay special attention to how the switch texture moves WITH the lift.
Now, walk around to the other side of this rectangle and look at the other switch. Press it and it will produce the same effect. But wait, something's different! This switch doesn't move with the lift! I'll explain why this is true later, but for now just make a note of it.
Take another look at the automap (press TAB). So far, all lines you have crossed are yellow. But look at the secret door. It's red, even though you can walk over it. This is a secret Linedef, and I'll show you how to make one in the second part of this tutorial.
In the eastern part of this room are some more boxes. You can get inside these boxes from the west side. Walk on in. After you have walked in, turn behind you and look out again.
Oh no! You're trapped!
Fear not, for there is an easy way out. In this small area are two switches. Walk to the southern one and press it. Now back up to the wall while still looking at the switch you just pressed. The ceiling of the area in front of you is moving!
We'll examine that in a moment, but first, let's exit this little area. Walk to the northern switch and press it. This lowers the floor and allows you to leave.
On the way out look at the crusher you started. Don't walk into it though! Unless you're invincible, it will kill you. Time to move on to the blue keycard room.
Head out of the yellow keycard door again and turn north. Cross the slime pit and enter the blue keycard room.
The Blue Keycard Room
There's a lot to do in this area, but let's start by turning east. You'll see two torches against a wall here, and you'll walk through these later, so remember where they are. Try walking up to the blue switch and pressing it. Oops! Guess you'll need the red keycard.
Anyway, walk along the northern wall until you see a switch and an arrow. The arrow is pointing upwards. Press this switch and look through the window that appears. The red keycard! We're not going to get this just yet though.
Walk around to the southern side of this small room, until you see an arrow pointing down. Press this switch and the window will close! To undo this, just walk around to the other arrow and press the switch next to it again. Now let's grab that keycard.
Go back to the two red torches and walk through them. The switch you just pressed raised the ceiling just enough so you can walk in!
Get the keycard and head out.
The Courtyard
Before moving on to that blue switch, turn your attention to the wood paneled area in the far eastern part of this room. Walk around the courtyard area both above and below. When you are done doing this, move on to that blue switch.
The Blue Switch
Walk up to that blue switch and press it. This time the metal barrier in front of you will open, revealing the last two areas of this tutorial.
Three Rooms in Short Order
Pressing the blue switch will open the metal barrier blocking your progress, revealing two new areas. For now, let's look at the northern area. We will deal with the western area later.
First run into the small room on the right (marked by hanging bodies) and QUICKLY run out. Look the room again. Looks like you activated a silent crusher.
Now go into the room on the left (marked by green torches). Don't worry, there's nothing lethal here. Try pressing the switch. Nothing happens. Now try running into the switch at high speeds. Still nothing.
Now throw your hands into the air in frustration. Nothing again. OK, take out your pistol and shoot the damned thing! There, now a floor on your right is going up to the ceiling. This type of switch is only activated through the use of your pistol, chaingun or fist.
Finally, go into the room a little to the north (marked by two pillars). Walk in and the four floors with start moving up and down. Walk onto any of these and they will take you up and down until you're nauseous. When you're done with the moving floors, head out again and proceed to the western area.
Rising floors Aplenty
In front of this room are three switches. Walk past the switches and go into the room. When you enter this large room the floor you are standing on rises. Keep walking towards the teleport (don't enter it yet) and the floor continues to rise. Turn around and look back from where you came. Note that the floor was divided into three sections, and all three are different heights.
Note: In HEXEN, weird things happen here, so you're warned. In fact, if you have more information on this area, please write me.
Fun with Switches
On the northern wall there are two switches side by side and a third by itself. Pressing any of the three switches will yield different results.
Experiment with these switches and then walk out of this room back into the room with the blue switch. Remember those three switches? Try pressing any of the three and observe the results. Each switch will make one part of the other room lower back down to where it was.
Have a look around
You have just completed a tour of the tutorial. We hoped you enjoyed the ride. Please pay the cashier on the way out. Take one last look around and then exit DOOM. It's now time to work with DeePsea!
PART TWO: THE MECHANICS OF THE WAD
This section explains, in full detail, how the switches operate and how to go about changing them. It also explains how to create a door and other simple areas. For the most part, it deals with some of hardest parts of DOOM level editing, working with Linedefs and switches.
I suggest you review the online Help (this file) to get familiar with the terminology and definitions.
DeePsea and the First Room
It's assumed that you have installed DeePsea already and have it on your desktop somewhere (duh)!
Using your mouse, select the File option on the top menu bar (or press Shiftl+F5) and then select Open PWAD. In the Open Dialog box that appears, modify the Directory and Drive boxes to select the correct drive and directory and then select:
DOOM1TUT.WAD <----- DOOM I
DOOM2TUT.WAD <----- DOOM II
HEXENTUT.WAD <----- HEXEN
Note: The default path determines the initial drive and directory that appears. Set the path using the F5 option. You can also enter the complete drive+directory+file in the file name box, for example,
C:\DEEPSEA\DOOM2TUT.WAD and press enter.
This will load the PWAD you just finished playing. If you are not in MAP01 or E1M1, select the File option again and select Edit level.
E1M1 --- DOOM I
MAP01 --- DOOM II and HEXEN
You are now in DeePsea map edit with the PWAD loaded.
How the four switches work
When you are back in DeePsea, enter Linedef mode by pressing the L key.
Quick note : When you move the cursor over the map, objects turn Yellow. This is DeePsea’s method of letting you know that the object can now be edited or selected. This is referred to as highlighting in the text.
Go to the first room of this WAD where we started. This is the player 1 start position. There are four switches positioned on three walls.
Move the cursor over the Linedef on the left wall to highlight it. The information box on the lower left hand side of the screen displays two important parts to this Linedef (press I to toggle the information box display) :
1. The Linedef does something. In this case, it lowers the floor to the floor next to it.
2. The second part is listed below. Now, let's edit that Linedef!
Editing the Linedef
One of the best ways to gain an understanding of how level editing works is through experimentation. This part of the tutorial covers how to edit Linedefs using DeePsea.
There are several steps to changing what a Linedef does. To edit this Linedef, highlight it while in Linedef mode, and follow these steps:
1. Press ENTER (or click the right mouse button)
This brings up the LineDef editing screen. You are presented with several options, including changing flags, type, the first and second Sidedefs, etc. Right now we are going to edit the LineDef type.
2. Click on the button Edit Type
You are presented with a list of Linedef types, sorted according to what they do. Note that Floors lower is already highlighted for you, since this is what the Linedef currently does. If the correct type is not highlighted, you are using a nonstandard font for your desktop "menu" setting that is outside of the automatic range DeePsea of compensation. Press F5 and experiment with the Font and Separator adjustment values. Add or subtract 1 to the values to get the highlighting to default correctly.
3. Choose Floors lower
For now, we will not be changing the basic function of the Linedef. It will still lower a floor when we are finished. All we're going to do now is determine how low the floor goes and how fast it lowers
4. Choose 71 S1 Lower floor to 8 above highest adjacent floor
You changed what the Linedef does to the Sector in the corner by selecting Linedef type 71 and pressing ENTER. You have just successfully changed a Linedef type!
5. Press ESC (or right click) to exit back out into the main editing screen (the right mouse button is easier for mouse users).
The second important component of this Linedef is the Sector tag. This is crucial to making a switch, or walking trigger (explained later) work correctly.
When you first highlighted this Linedef, the Sector in the southwest and southeast corners lit up. This means that those Sectors have the same Sector tag as the Linedef you have highlighted. Whenever you flip a switch, it will affect only Sectors who have the same Sector tag as the Linedef that has the switch.
In Linedef mode, this is called the Sector tag, indicating that all Sectors with this tag number are affected.
In Sector mode, it is referred as the Linedef tag, meaning the number in the Linedef that refers to this Sector.
These are both the SAME number. It depends on the viewpoint whether you call it a Sector tag or a Linedef tag. You see, when you are editing Linedefs, it means find all Sectors that have this tag number, hence the term Sector tag. When you are editing Sectors, it means find all Linedefs that have this tag number, hence the term Linedef tag.
I hope this is not too confusing. It is important to not be confused here, since this is the key to making teleports, lifts and anything else that moves!
Press S to go into Sector mode. Move the cursor over either of the two boxes in the southern area. The Linedef that you just changed lights up. Note the Sector tag of this Sector in the information box.
Now, go back into Linedef mode by pressing L. Look at the Linedef that you just edited - same tag. It's very important to use the correct tag number when editing Linedefs and Sectors. If you don't, the effect you want doesn't happen and at the worst DOOM can crash!
Switch Second from left
Now let's look at the switch second from the left. Move the cursor over the Linedef to highlight it. As with the first Linedef you highlighted, highlighting this one will make a Sector light up. This Linedef will lower all Sectors with the same Sector tag to eight units above the neighboring floor.
Let's change this Linedef too.
1. Press ENTER (or click the right mouse button)
2. Click on the button Edit Type
3. Choose Floors lower
4. Choose 71 S1 Lower floor to 8 above highest adjacent floor
As you already know, S denotes that this Linedef is triggered by using it and W denotes that you must walk over it. But what about 1 and R ? 1 means that the switch will only work once, R means that a switch will work an unlimited number of times. When we test this WAD, you will see the difference between 1 and R.
Switch Second from the right
Highlight the Linedef second from the right. The box in the northeast corner lights up when you do.
The switch second from the right differs from the first two. This switch opens doors. Let's edit this switch as we did the first two.
1. Press ENTER (or click the right mouse button)
2. Click on the button Edit Type
3. Select Doors (open)
4. Select 115 SR Door open fast, stays open
The first two Linedefs we dealt with only lowered floors down. This Linedef moves the floor/ceiling in a manner recognized as a door. Hint, doors can be made using other types of linedefs, such as lifts.
The door now rises much faster than it did before when we press the switch.
Switch on Far Right
We will also change the final switch in this room. Highlight the Linedef on the far right. The two southern Sectors should light up.
1. Press ENTER (or click the right mouse button)
2. Click on the button Edit Type
3. Select Doors (open)
4. Select 61 SR Open door, stays open
Instead of the door going up fast, it will now go up much slower.
Saving your WAD
Now that you're done changing Linedefs, it's time to save your wad! To make sure you have not accidentally changed something you were not supposed to, press F10 and select B to check your level.
Then using the mouse, select File on the top menu bar far left (or press ALT+F).
Scroll down to Save and press enter. You are prompted for a file name. Keep the name the same and press ENTER (pressing F2 does both).
NOTE: If you accidentally moved any vertexes, DeePsea will prompt you to build nodes. Press Y if you are given this question. DeePsea will rebuild the nodes (via DeePBSP) and your WAD will be ready to play!
Exit back out to DOS or select a desktop shortcut and run DOOM as you first did. You will now be in your modified WAD. (If you have registered, you can select test level and play right now.)
The First Room Re-visited
The far left switch
Now it's time to see your modification in action!
Start by pressing the switch on the far left as you did earlier. Now the floor lowers, but not all the way to the ground. You can now see a small part stick out of the ground. This is because the Linedef type tells the Sector to lower until the floor is 8 units above the floor next to it.
The switch second from the left
Walk up to the switch second from the left and press it again. It does the same thing that the last switch did. Step back from the switch and look at the far left switch and the switch you just pressed. Notice anything different?
The switch you just pressed is still black while the one on the left is red. Why? The one on the left is a S1 switch, which means once you've pressed it, it can never be pressed again.
The second switch pressed is a SR switch, which means you can walk up and press it to your heart's content, although it won't do anything until the floor is raised again.
The switch second from the right
The two noticeable differences here are:
1. The ceiling will rise much faster than it used to.
2. The switch darkens once it is pressed.
Like the last switch, it is a SR, so you can press it as many times as you want.
The switch on the far right
Like the last switch, the speed in which the ceiling rises is much slower. Similar to the last two, this switch can be pressed infinitely (well close to it).
Back to DeePsea and Teleports!
Now that you've edited the Linedef, it's time to move onto one of DOOM's more complicated features, the teleport!
I've already created a simple teleport in the first room, and you can create another. Follow these steps to make the teleport.
1. Enter Linedef mode by pressing L
We will start by changing the Linedef type to make a teleport.
2. Select all four Linedefs of the box in the southwest corner
Click on each Linedef so that it turns dark green. Clicking means pressing the left mouse button quickly after each Linedef is yellow and then move on to the next one.
After you do this, you have selected the Linedefs and all changes made now will affect all Linedefs selected.
3. Press ENTER
Enter Linedef edit mode to begin editing
4. Select Sector Tag
Before doing anything, we must first assign a tag to our Linedefs. DeePsea will prompt you to enter a tag number. In parentheses DeePsea will give the following: (fXX)
This number is a free tag. That means it is used nowhere else in the level. Enter the number it gives you (27) and press ENTER.
5. Select Edit the Linedef, then Edit type
Now that you are back in the Linedef type sub-menu, you can define what these four Linedefs do.
6. Select Special
Special Linedefs are those that cannot be defined under the other categories. This includes teleports.
7. Select 97 WR Teleport to another Sector (w/Telething)
By choosing the Linedef type you have just reached the halfway mark on creating a teleport. Press ENTER to select the Linedef type and exit back into the main screen
8. Press S to enter Sector mode
Now that you have defined what the Linedefs to, it's time to make a Sector that the player can teleport to.
9. Highlight the Sector in the southeast corner and press ENTER
Now you will be back in the Sector edit screen. From here we will assign a tag to the Sector.
10. Select Linedef Tag
You are now presented with the option to enter a Linedef tag. The yellow text in this box gives you the last tag number used, 27. Type 27 and press enter.
Almost there!
11. Enter thing mode by pressing T
Now that you are in thing mode, you can add a special type of thing, one that allows teleportation.
12. Set the grid to 8 by pressing G (if not already 8, check the bottom status bar).
Press G until the box labeled grid reads 8.
13. Move the cursor inside the Sector and double left-click (or press INS).
By moving the cursor inside the Sector and double left-clicking (or pressing INS), you will have created a monster, the trooper.
We don't need him so let's edit this Thing and change it to what we need.
14. Press ENTER then select Change Type
The Thing edit screen is similar to the Linedef editing screen. You are given options about what the Thing is and when it appears (according to skill level). Clicking Change Type will present a list of things.
15. Select Player Start/Teleport
Selecting this item will give you another list, including the thing we are interested in.
16. Select Teleport Landing
Highlight or click on teleport landing and press ENTER. Now run the error checker.
17. Press F10, then select B Check 2...8 all
Now DeePsea's comprehensive level checker will go into action. If any problems are found with the teleport you just made, you will be told what is wrong. If DeePsea reports you have no teleport thing in the Sector, then move the teleport landing (it should be yellow) into the Sector you have tagged.
18. Change which direction the teleport Thing faces
Highlight the teleport landing and press the < and > keys to change the direction it faces. Which direction this points is what direction YOU will face when you exit the teleport.
19. Save and exit!
Follow the steps above on saving and exiting. Now were ready to try it out!
Test of the teleports
Start DOOM and load your file again. Press the four switches on the wall to make your teleport possible to use. Walk over to the southwest corner into the box. If you teleported, congratulations! If not, here are some troubleshooting tips:
Problem : Nothing happens
Solution: This is caused by not having the teleport landing in the Sector. If you ran DeePsea's error checker, it should have reported this error.
Problem: DOOM crashes
Solution: This is most likely caused by not changing the Linedef tag. If it's still set to 0 instead of 27, then DOOM will crash.
Drawing your own areas
The large, dark area in the yellow keycard room has been provided so you can experiment with drawing a lift and a switch. Before we begin drawing a sample lift, first go into vertex mode by pressing V.
Making a Lift
This is one of many ways to make a lift.)
1. Press G until the grid is 64
Change the grid to 64 for now so the lift drawn is simple.
2. Press H to reveal the grid
The grid will appear when you press H. This will allow easy drawing of your Linedefs.
3. Double left click or press Ins (Vertex Mode only or press ctrl+D in any mode)
This brings you into one of DeePsea's best features, line drawing mode. An information box will appear in the upper left hand corner. This is helpful for advanced and beginning users alike. Pay special attention to the first line, which tells you how long the line you are drawing is. The length is also conveniently displayed right next to the cursor.
4. Left click near the upper left hand corner.
This will mark the first vertex of your lift. From here drawing is made simple through DeePsea's Intelligent Inference Drawing (IID).
5. Drawing CLOCKWISE, draw the first three lines of the box.
The box you have drawn will look like this:
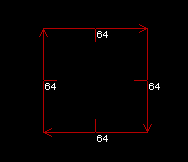
Make sure each side is 64 in length. If the grid was turned on, then drawing this box will be easy.
6. Right click once to close your Sector
Right clicking draws the final line and closes the Sector. You have finished creating your first Sector! Yay.
7. Right click again to exit Linedef drawing mode.
Edit that Sector!
Now that you have created a Sector, it's time to edit it by going into Sector mode and giving it some attributes.
1. Press S to enter Sector mode so you can edit your Sector.
2. Highlight the Sector and press ENTER (or right click once)
You are now in Sector editing mode. First off, we need to make a tag, like we did with the teleport. Move down to LineDef Tag and press ENTER.
3. Assign your Sector an unused tag.
Select Linedef tag and press enter.
DeePsea's Sector tag box will pop up. As with your teleport, you will need an unused tag, so type in the number that DeePsea reports is free. Press ENTER when you're done.
4. Change the floor height.
The floor of your box needs to be higher than the floor around it so we can make a lift. Select Change floor height and type 128. Press ENTER.
5. Go into Linedef mode and finish the lift.
By changing the floor height, you have created the need for a lower texture.
Press L to re-enter Linedef mode. Select all four Linedefs by left clicking on each one. When you have selected all four, press F8 to open the Misc. menu.
Select option 6, which will flip the direction your Sidedefs face. When you have completed this step, all of your Linedefs should be pointing outwards (you can also press Ctrl+F).
6. Add some textures
You will need to add some textures for the player to see. Select Edit 1st Sidedef and press ENTER.
You are now given the option of changing the textures. Note in the Lower texture option the word missing. This means that no texture is currently there, but one is required. Add one by selecting the Lower texture option and pressing enter.
Another box pops up, the texture selector. There are many, many textures to choose from but we are only interested in one. (You can browse all of the textures by pressing Browse or left clicking inside the texture display box.)
Type the word PLAT1. A texture resembling a lift appears. Press ENTER to accept this texture.
7. Edit the attributes of the four Linedefs
Press Enter (or Right click) to begin editing the Linedef.
A. First, make the tag number the same as the Sector.
Select Sector tag and press ENTER. At the top of this box, DeePsea reports the Sector tag you just used for your Sector. Type in that number and press ENTER (you could also directly enter it in the dialog).
B. Now select Linedef Type.
1. Select Lifts and Moving.
2. Select the following Linedef: 62 SR Lower lift, wait, rise
You have now defined what you want your Sector to do when a player tries to use it. Right click to exit this menu.
8. Check your work
Press C to clear all selected Linedefs.
Now highlight any of the four Linedefs.
Did the Sector you made light up? If not, then they don't have the same tag number. Go into Sector edit mode and change the tag to the same number as the Linedefs.
Run DeePsea's error checker. If it reports no problems, then you're ready to go! Save, build the nodes and get ready to test.
Test the level as you did before.
Approach the lift and press the Open (Use) button. If the lift lowers, then you have just created a simple Sector and made it into a lift. If the lift does not lower, then look below for a list of possible reasons. Note: I assume you have run the error checker (F10 Check 2...8 all).
Problem: Trying to use the lift does nothing
Solution: The first Sidedef (the one you just added a texture to) is facing the wrong direction. All Linedefs should be pointing outwards, like this:
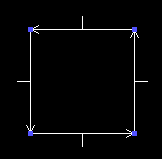
If your Sector does not resemble this, then re-read step 5. A completed lift has been included so compare the correct lift to yours if you encounter problems.
Bibliography
If you are interested in knowing more about DOOM editing terminology, it may interest you to read The Wad Designer's Handbook (it's free) or Tricks of the DOOM Programming Gurus or 3D Alchemy (latter is newer version of Tricks, about $30-40 retail). Both of these explain how to create a basic level, but more importantly they'll familiarize you with terms like Vertex, Sidedef, and Sector.
Check our Website for links to DOOM related sites, such a www.doomworld.com. There is a wealth of information available online, although some of it is not always correctJ
Learn from Examples
The best way to learn about level construction is by looking at examples. If you have DOOM I, look at E2M1 for a good idea of how teleports and doors operate. If you use DOOM II, look at MAP1-MAP4. These four levels combined provide an excellent example of how to make levels.
End TUTORIAL
Part III DEEPEXAM.WAD - Examples of DeeP construction objects
DeePsea assumes you have DOOMx version 1.9, this PWAD may not work on older versions!
DEEPEXAM.WAD gives picture of the objects you can readily make with the DeePsea tools.
Each element is readily viewable. The favorite topics of teleports, doors, stairs, rising stair, windows, pools, pillars and some basic how-to-get-a-look are shown by example in this level.
You can play it (of course), but the main goal was to have some fun AND see how to do it.
Almost ALL the objects were made with the Tools. Very little manual drawing was done. Access the Tools by pressing F9 and selecting what you want.
You don't have to know all the details. Copy what's done and later figure out the why's<g>.
Some simple guidelines:
Use the scaling and rotate feature to size and position objects made. (Press F1 for the keys to use).
When you draw lines, pay attention to the direction of the arrows. They have to be the same as shown, or it won't be the SAME.
Here's a brief overview of how the level was made:
1. The big outside polygon was drawn first (use F9 polygon object Tool).
2. The spiral center was made using the stair tool. This was then edited into sections and touched up in width at the end by dragging thevertices over.
3. The Window walls next to where you start were dropped in. The sides were merged into the polygon sides. The sidedefs and textures were corrected as required. I suggest you build a duplicate window right next to the one shown and you'll see that some tinkering is required.
4. The corridor to the left (as you look at the map) was done in Vertex line drawing mode. The doors were drawn in and make a door from 4-linedefs was used to make the doors. Again, the blending of the walls to the polygon side had some adjustments.
5. One polygon 6-sided plain object was made. This is the column. This was then cloned using Copy and then Pasted repeatedly.
6. The pool was made as 2 pool objects with a bunch of sides to get it round looking. Use the F8 X-alignment to get it to look good. This also applies to all the walls.
7. The letters were made by hand, although the second DeeP was cloned from the first, by copy/paste and then scale/rotate. Just remember that when you draw block letters, always go clockwise. There is a Sector between the 2 LineDefs to give the depth to the letters.
8. The little stairs and pedestal were also Tooled in.
9. The visible Teleports were made using the teleport Tool. The tags making it work were done at the same time (so you don't forget).
10. Extra LineDefs were drawn on the curving stair to serve as teleports. They are made in Vertex mode. Press Ins (or left-double click) to start. Then when you have the cursor right on top of a LineDef left click. Move the cursor to the other side and left click again. Now press the right mouse button and choose 2-sided LineDef from the menu.
11. Things were put in.
That covers almost everything!
SPECIAL NOTE:
The walls have to be positioned where they are as full height! If you move areas and expose more visible areas, you may get visi-plane overflow errors. Sorry, that's a DOOM engine limit! So if you get that error, block the line-of-sight with a WALL. That's what was done here.
Part IV SCRIPTS.WAD - Example of HEXEN scripting
The files SCRIPTS.WAD, SCRIPTS.DOC and SCRIPTS.ACS were written by Chris Becker, with slight editing. They contain a basic introduction to HEXEN scripts. Thank you Chris for helping us out!
Please review his documentation and level for further information.