DeePsea has five Tool Bar options.
First thereís the Top Tool bar on the main editing window. This has a set of fixed common map commands for easy access. Press Scroll to Toggle top the top Tool Bar.
In addition, there are four more optional Tool bars that can be dragged and resized. They can be displayed in 3 different formats and each format can have an optional border. The contents of these Tool bars can be customized by you, both what command they perform and the visual content of the buttons. You can have an unlimited number of preconfigured Tool bar definitions. Choose the one you want for each tool bar using the load commands described below. DeePsea ships with 4 predefined Tool bar configurations.
The following keyboard commands control the Tool bars.
ToolBar Commands
|
Pause |
Load Tool Bar Display and Style Dialog control |
|
Scroll |
Toggle top Tool Bar |
|
Shift+Scroll |
Load Tool Bar Definition Dialog |
|
|
|
ToolBar operation
The top Tool bar is always displayed on the top of the editing window and contains the most common commands. In addtion, it does not take up any valuable screen editing space at all (as do common toolbars)! If you donít need or use it, deactivate it by pressing the Scroll key. Press Scroll again to reactivate - itís that simple.
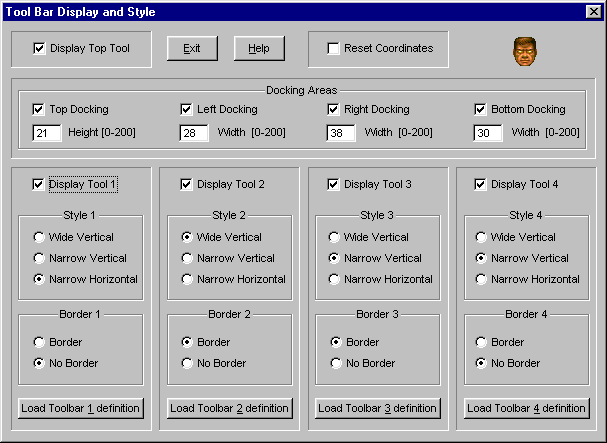
The other 4 tool bars float over the level or you can dock them in optional docking areas. You can move them anywhere on the screen. Each one of these toolbars can contain up to 24 custom commands. Each set of custom commands is stored in a .TOL file. DeePsea automatically ships with 4 custom TOL files. Three are automatically loaded. The are all in the narrow vertical style. You can change the presence and style by pressing Pause, then setting your preferences in the following dialog:

The bottom buttons in the above let you change the Tool bar definition. You can have as many custom definitions as you like, each stored in a separate file and each customized for a special task. For example, one of the toolbars shipped with DeePsea is called ToolPrefabs.TOL. This tool bar definition contains all the prefab tools. If you activate this tool, it becomes very quick and easy to readily access any of these when drawing a level. Another one is called ToolBarControl.TOL which contains all the tool bar manipulation commands. Itís not loaded by default, but this is Tool Bar 4. Load it to get a quick handle on what you can do with Tool Bars. The following dialog sets your toolbar commands and look:

ToolBar Docking Areas
There are 4 docking areas: two horizontal (on top and on the bottom) and two vertical (left and right side). Check/Uncheck the Active checkbox as desired. The width of each docking area can be from 0 to 200 pixels wide.
By placing the toolbars in these areas, it is easier to use the edges to scroll since the edges of the docking areas become the scroll boundaries. However, if you may prefer floating toolbars (or none), disabling the areas will give you more screen space.
ToolBar Dragging, Minimizing, Resizing and Buttons
Place the cursor in the top Tool bar area or any area between the buttons, press the left mouse button and move the mouse to drag the Toolbar anywhere.
There are 2 buttons on the vertical tool bars and one button on the narrow horizontal. The button with a number displayed represents the tool bar number. You can press this button to close the tool bar. You can also right click on any open area.
The other button will minimize the tool bar and place it down below the map out of the way. Press this button again to make it reappear. Pressing a reactivation command also automatically pops the toolbar back up on the screen.
If you choose a tool format with a border frame, then you can grab the sides of the Tool bar and then drag the edge to change the size of the Tool dialog. If you make a wide tool bar narrow, it automatically becomes a narrow vertical tool bar. Similarly, if you take a narrow tool bar and make it wider, it becomes a wide tool bar. The horizontal format is similar. Resize a horizontal tool bar taller and it becomes a tall vertical tool bar. Resize a vertical tool bar shorter and it becomes a horizontal tool bar.
Creating a new Tool Bar definition
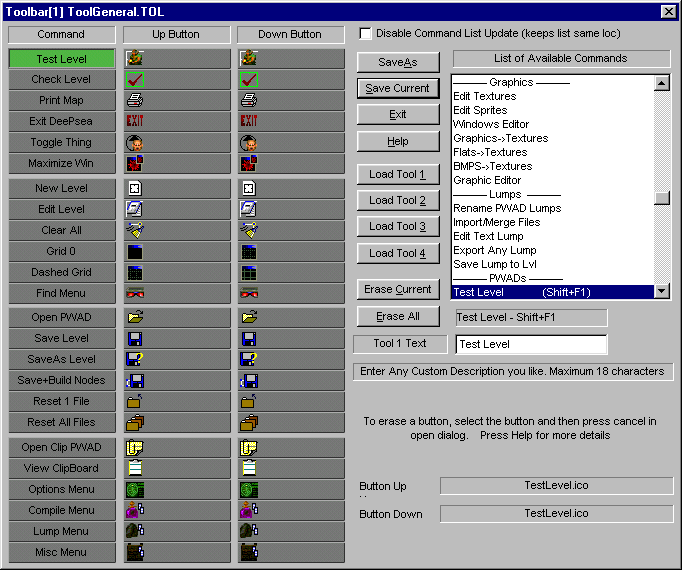
To redefine or create or new vertical Tool bar, select the Option Menu and then select Define ToolBar Commands. The define ToolBar dialog is easy to configure. Hereís how it works:
The 1st set of buttons displays the Text displayed on a button for any command selected.
The 2nd set of buttons is an optional bitmap or icon representing the Up button position.
The 3rd set of buttons is an optional bitmap or icon representing the Down button position.
Selecting a button from the 1st list lets you modify the command the button represents. Select a command from the list shown on the far right. Youíll see the new text appear on the button and on a text entry box below the list of commands. You can type any new description for the command selected, up to 19 characters, replacing the default text displayed.
Check the topmost "Disable Command List Update" to keep the listbox focused in one area. This may make it easier to edit commands.
Selecting a button from the 2nd list brings up a file open asking you which bitmap to use for the Up button position. This is NOT required, but if you have something you think will look cool, use it.
Similarly, selecting a button from the 3rd list brings up the same thing for the Down button position. Again, this is optional.
There are 3 sets of radio buttons in this dialog. They set the border style of each of the different ways a tool bar can be displayed. Tool bars with a border can be dynamically style switched just by dragging the edges. Just try out the different flavors and pick one that suits you!
Bitmaps and Icons are normally stored in the subdirectory called TOOLBARBUTTTONS.
You can use either bitmaps or icons on the Tool bars. Icons should be 18x18. All icons are resized 18x18 regardless of the original dimensions. Icons have the advantage of making it easy to match the colors. DeePsea ships with one tool bar that is constructed with icons: ToolTutorial.TOL. The text is automatically created with Icons.
Bitmaps can be any size, however, 2 sizes are recommended. Either a 108x21 size that covers the whole button or a 27x18 size. If a button is less than 108 wide the remaining space is automatically used to display the button text up to the amount of space available. This saves you the task of having to put text on the bitmaps and makes it easy to change. Any bitmap data that is too large is not displayed, so thatís NOT recommended since all it does is take up memory!
A height of 18 also means you donít have to draw any "lines" designating the button position. These will appear automatically. Similarly, a narrower width (for example 27) saves you from having to draw any lines indicating a button position. Any bitmap that is 4 less than the maximum is shifted over 2. Heights are automatically centered if they are less than 21 high.
There are two default bitmaps supplied that you can use for you own custom designs: DeePseaUpButton.BMP and DeePseaDownButton.BMP in the main DeePsea directory. Use these as size examples for your own custom buttons. They are 108 x 21 pixels in size. The buttons use the DOOM palette and will automatically match any of the other games. Some colors may not match perfectly. This is usually not a problem. Technically, you can use any palette, however, itís suggested to use the same one for all the buttons to make life simpler for you.
If you use bitmaps that are smaller than 108, the button color may not match the color used by DeePsea if you change the gamma setting and a wide vertical tool is displayed. Not a big deal, but just so you know.
To clear a bitmap name (and go back to just a text button), select the button for the existing bitmap and then when the file open dialog appears, press Cancel. This will clear the bitmap name. Usually this "trick"is used to clear a bitmap name where the directory chosen was not the standard default subdirectory of "ToolBarButtons".
Changing Default Button Colors
You can change the default color of the buttons (if you donít have a bitmap overlaying the whole area). Press F5 and select Color. Check for the ToolBar color options. They control the Up/Down color, the rectangle hilight color (for the wide vertical toolbar) and color used to the edges to indicate up and down positions.
Buttons Sounds
Various commands require different settings to function. For example, if you used a "sector" editing command in linedef mode (as a button command), it wonít work. The button will issue a "wrong mode" sound. If a command is already active, a "busy command" sound is hear. And finally, if when a command executes, an "execute" sound is played. You can change these in F5/Sounds.
Variable size Tool Bars
DeePsea creates variable size Tool Bars. The _________ entry in the list of commands has a special purpose. Wherever this entry is selected for a button, the Tool Bar dialog will stop displaying. Itís possible to have other commands on the Tool bar, but they wonít show when the Tool bar pops up. However, you can resize the Tool bar - by dragging on the bottom edge - and now you will see the other commands (if you had any).
You can type any text you like in the __________ entry to help you describe what the Tool bar is for. If you want to use the __ entry, you can cut & paste these characters from the entry box, in addition to typing any text.
If you choose an entry with __sometext__ this will display on your tool bar. One use would be to describe your tool bar functions.
Resetting Tool Bar Coordinates
If you somehow loose sight of the tool bars, check the Reset Coordinates in the Tool Bar Display and Style Dialog. The locations of all the tool bars are reset to the default locations.