Door Creation
There are four ways you can make a door:
1. Predefined door (easiest for beginners, but useful for experts too)
2. From 4-linedefs (a good way to learn how to do 4)
3. From a sector (easy if you have it made right)
4. Completely from scratch (once you learn this, you are there)
Predefined Door (also know as Prefab)
Select Prefab from the top menu or Press F9 and select Door. The predefined door makes a finished door that you drag into place after you make it. When you make the door, you must make sure that it is placed inside the enclosed area where you want the door. In other words, you can't make it in another area and then drag it somewhere else. The reason this won't work is that DeePsea pre-calculates all the Sector references and if you move it from one area to another, they will all be incorrect (resulting in Sector not Closed messages).
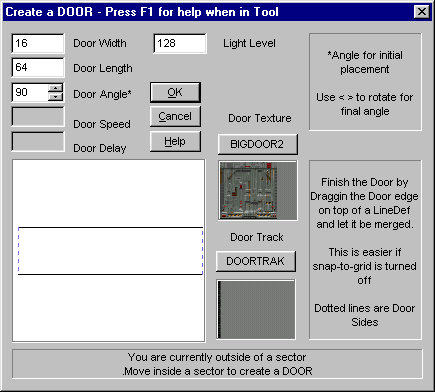
Enter the width and height (length) of the Door and DeePsea automatically inserts the Vertices, LineDefs, SideDefs, and Sector at the current pointer location. Everything is made for a Door.
Drag the Door over where you want it. Rotate it as required or drag the vertices. You can prerotate the door by entering the Door Angle field in the Dialog. The easiest way to connect it to a hallway is to select the door ends and drag them on top of the hallway LineDef one at a time.
If everything is aligned on the grid then snap to grid helps you. If not, turn snap off.
Fix any missing textures as appropriate. This displays on the bottom panels as missing.
Here's what you do to finish the prefab door: After you make the Door, drag the 2 edges (a and b) shown below, over on top of each side A and B so they merge.
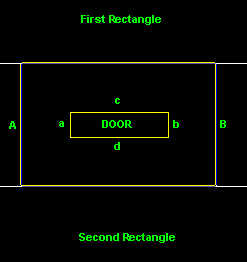
A and B are 1-sided LineDefs!
a and b are 1-sided LineDefs!
c and d are 2-sided LineDefs!
If you have the door going from top to bottom, you drag the top and bottom.
Make a Door from 4 LineDefs
Select 4 LineDefs that will be come the 4 Door sides and then activate this function.
The LineDefs, Ceiling height, textures, etc., are modified accordingly.
The 4 LineDefs are required to be 4 types as shown below. Note the direction of the lines as indicated by the arrows:

L1 and L3 are counter clockwise. They should be at least 1-sided. In the end they are made 2-sided.
L2 and L4 are 1-sided and clockwise.
Working with 4 Existing LineDefs
If you have 4 existing LineDefs, but one of the Door sides is oriented in the wrong direction, use Misc Flip LineDef to fix.
Don't mess with the sides. They should be going in opposite directions already, like in a hall. If you flip them, you may have to fix what they connect to also!
It doesn't matter if all the SideDefs exist already or not.
1. Enter LineDef mode (L) and select the 4 LineDefs L1, L2, L3, L4 (Left mouse click them one at a time.)
2. Select Misc from the top menu and select Create Door from 4 LineDefs.
3. You are done!
Working with No Existing LineDefs
We're going to assume you have a hallway already and want to put a door in it.
This is what you have so far, it doesn't matter where they start or end.
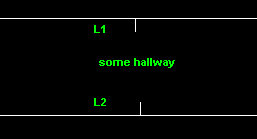
Snap-to-grid normally helps place the vertex on top of a LineDef. However, if the LineDef runs at a slant, it may be easier to turn snap-to-grid off (/) so you can place it wherever you want it.
It's also suggested to run at a minimum Zoom of 500 to make it easier to align!
1. Enter LineDraw mode. Press Ctrl+D or quick double right click and select LineDraw.
2. Place your first vertex v1 right on top of L1 where you want the door by pressing the Left mouse button.
3. Move over to the left (width of door) and Left click again to place the second Vertex v2.
4. This is what is should look like now:
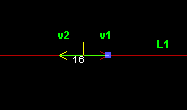
If you did it correctly, the line turned Red and you have 2 vertices since the split line goes to the Right and you drew to the Left. This is OK. The same thing happens again in the next 2 steps.
5. Now move down from v2 and down to L2. Press the Left mouse button on top of the line to create vertex v3 (see full picture below).
6. Now move to the right from v3 and line up with v1 and press the Left mouse button.
7. Now click the Right Mouse Button to finish the area. You do not need to draw back to v1, that's done by itself. (If you did draw back, it will work too!).
8. Right click again to exit LineDraw mode if you have nothing else to draw.
9. This is the final result. See how the sides turned out OK.
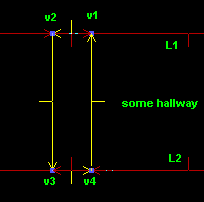
10. Enter LineDef mode (if not already there). The 4 linedefs should all be already selected. If not, select the 4 LineDefs. (Left mouse click them one at a time).
11. Select Misc from the top menu and select Create Door from 4 LineDefs.
12. You are done!
The method shown, automatically picks up the correct reference sector from the sides, the ones
we drew on top of, so the bottom of the Door Sector is correct.
Make Door from Sector
The Sector chosen should be between 2 other Sectors. The original layout should resemble the following:
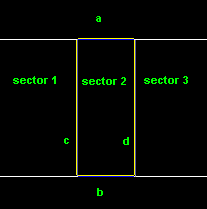
Please note:
1. LineDefs a and b are 1-sided.
2. LineDefs c and d are 2-sided.
3. All the linedefs go clock-wise.
If you do not have it exactly as shown, messages, appear telling you what's wrong. The most common one is forgetting to have one only 1 sidedef for a and b. The resulting message explains that you have too many door sides.